Why Aluminum Hulls Corrode Faster Than You Think
Galvanic corrosion on an aluminum yacht hull is more than a cosmetic issue. Dissimilar metals, unsuitable fasteners, damaged coatings, shore-power faults and incorrect anode selection can accelerate underwater corrosion, so diagnosis should include the complete bonding, electrical and material system.
Here’s the electrochemistry in plain terms: aluminum sits near the top of the galvanic series. It’s highly active and wants to give up electrons. When you bolt or weld stainless steel fasteners, bronze through-hulls, or steel props to aluminum in saltwater, you create a battery. Saltwater becomes the electrolyte. Electrons flow from the aluminum (the anode) to the more “noble” metals (the cathodes), and aluminum corrodes rapidly in the process. That’s what makes this electrochemical coupling endearing to metallurgists and absolutely brutal to boat owners.
The culprits are specific. Stainless steel fasteners corrode aluminum 10-15 times faster than aluminum-to-aluminum connections. Bronze sea-strainer housings and through-hulls accelerate corrosion in their immediate vicinity. Mild steel propellers create zones of severe attack where they’re bolted on. Even copper-nickel sea chests and brass ball valves participate in this galvanic chain.
The real damage sneaks up on you. I watched a friend’s 52-foot motor yacht experience what the surveyor called “advanced localized pitting” at the prop shaft seal area after just two seasons. Frustrated by what appeared to be minor surface wear, my friend ignored the warning signs using standard visual inspection. The aluminum had thinned from 0.25 inches to nearly 0.12 inches in a 3-inch diameter zone. Replacement cost was $18,000. The corrosion had been invisible from above the waterline until structural failure became a real risk.
Early Warning Signs Before Hull Damage Spreads
You don’t need sophisticated testing to catch galvanic corrosion early. Visual inspection works if you know what to look for.
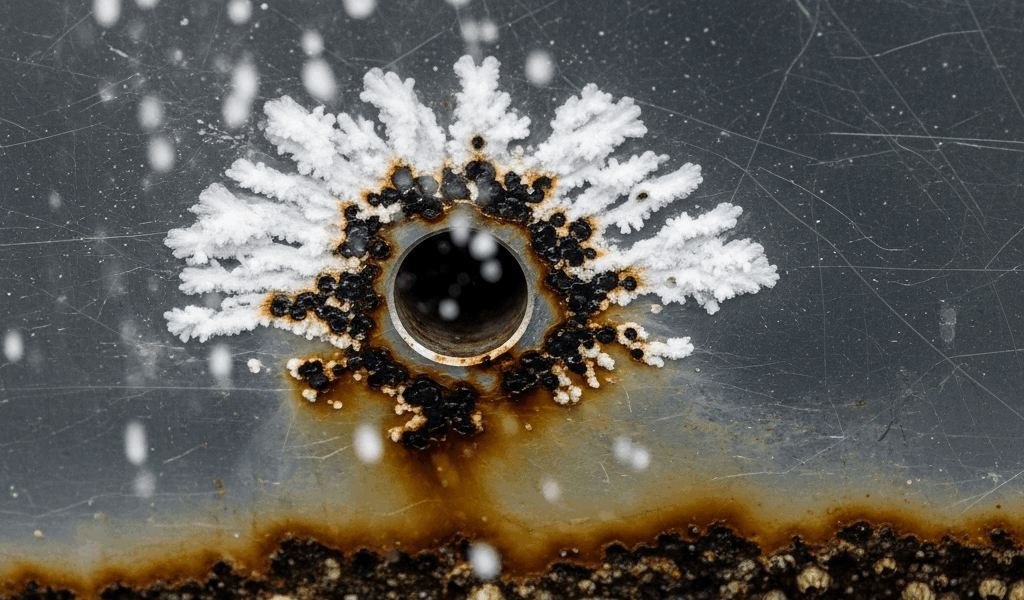
Start at the waterline during a haul-out. Run your hand along the hull at the water-stain mark. Pitting feels like tiny craters — you’ll feel roughness instead of smooth gelcoat or paint. This is your first signal. White powder or pale gray deposits near fasteners or metal fittings are aluminum hydroxide, the corrosion byproduct. That powder is your hull corroding.
Focus on three danger zones. The propeller shaft area is ground zero. Examine the area where the prop hub sits and where shaft strut bolts contact the hull. Keel bolts and keel attachment points suffer severe attack because they’re deeply submerged and contact stainless steel. Sea-strainer housings and through-hull fittings create localized corrosion halos around them.
Small surface pits that owners typically ignore are actually dangerous. I made this mistake initially. A pit less than 1/8 inch deep seemed cosmetic. The surveyor explained that pits concentrate stress and accelerate subsurface corrosion. A pit pattern expanding 0.05 inches per year means structural thickness loss within 5-10 years. Don’t make my mistake.
Look for discoloration too. Darkening or staining around fasteners indicates active galvanic activity. The darker the stain, the faster the electron transfer. Take a photo during your first haul-out. Compare it to photos from the previous season. Growth tells you whether your current prevention system is working.
Zinc Anodes Alone Won’t Save You
Zinc anodes work. They sacrifice themselves to protect aluminum. But they have real limits that most owners don’t understand.
Zinc’s sacrifice rate depends on two variables: surface area and water conductivity. A typical 2-pound zinc anode corrodes completely in 12-24 months depending on whether your boat is in low-conductivity freshwater systems or high-conductivity saltwater. Many owners replace anodes on 24-month schedules and assume they’re protected. That assumption fails when water conductivity is high or when multiple dissimilar metals are clustered together.
The failure mode is simple: zinc depletion plus unprotected dissimilar metals still corroding. I watched a boat owner haul out to find completely eroded zincs at 14 months while the aluminum around his stainless steel fasteners still showed active pitting. The zinc was gone. The stainless fastener was still pulling electrons from the hull.
Probably should have opened with this section, honestly. Zinc anodes are necessary but not sufficient. They protect the hull surface generally, but they can’t isolate the electrochemical couples created by fasteners and fittings. They work best as a secondary defense, not as your primary corrosion prevention strategy. I’m apparently the type who learns this lesson the expensive way while other boat owners never figure it out.
Cathodic protection systems can be overextended too. If you have seven stainless steel through-hulls, two bronze sea-strainer housings, a steel prop, and stock galvanic anodes, the anodes can’t generate enough current to protect the entire galvanic couple system. Some dissimilar metals will still corrode while anodes handle others.
Isolation and Cathodic Protection Setup
Real corrosion prevention combines isolation of dissimilar metals with upgraded anode coverage. This is mechanical problem-solving, not chemistry magic.
Start with fasteners. Any stainless steel fastener penetrating the hull or bolted to aluminum submerged components should be isolated using nylon washers and PTFE tape. A stainless M10 through-bolt becomes much less of a galvanic couple when separated from aluminum with a nylon washer (roughly $0.80 per fastener) and wrapped with marine-grade PTFE tape. I’ve used Teflon PTFE plumber’s tape rated for saltwater ($6-12 per roll). It doesn’t degrade and creates electrical isolation.
Replace bronze through-hulls with aluminum alternatives where feasible. A typical 1-inch through-hull housing costs $180-320 in aluminum versus $280-450 in bronze. The upfront cost difference is minimal. Over the life of the boat, galvanic isolation saves thousands in corrosion management. Sea-strainer housings represent a major corrosion risk — replacing a bronze housing ($320-600) with an aluminum or titanium unit ($480-900) removes a significant couple.
Upgrade anode placement and mass. Instead of relying on two standard 2-pound zincs, consider a distributed system using smaller anodes positioned near major dissimilar metal installations. Place anodes at the keel area, the propeller shaft strut, and the sea-strainer zone. Three 1.5-pound anodes cost roughly the same as two 2-pound anodes but distribute protective current more evenly. Total materials cost for a comprehensive retrofit runs $3,000-8,000 depending on hull size and existing dissimilar metal inventory.
For boats 45+ feet, impressed current cathodic protection (ICCP) systems provide active corrosion control beyond passive zinc anodes. An ICCP system uses a small electrical power source to drive protective current onto the hull. It costs $4,000-10,000 installed but eliminates zinc replacement intervals and adapts automatically to changing water conductivity. ICCP works for boats that spend extended time in varying salinity environments.
Maintenance Schedule to Catch Corrosion Early
Prevention requires a real schedule, not wishful thinking.
Haul out quarterly or every 400 operating hours, whichever comes first. During haul-out, inspect the three danger zones documented earlier: prop shaft area, keel bolts, and through-hull fittings. Photograph the same spots each time. Measure pit depth using a small ruler or depth gauge. Document dimensions and locations. This progression data is your most valuable corrosion diagnostic.
Replace zinc anodes on a 12-18 month cycle in high-conductivity saltwater, 18-24 months in moderate-use systems. Don’t wait until they’re completely depleted — a 50%-eroded anode is your signal to replace. Typical replacement cost is $180-400 per anode. Labor adds $200-500 if you’re not doing the work yourself.
Test water conductivity annually. You can purchase a simple handheld conductivity meter ($60-150) from marine supply catalogs. Record the value. Conductivity above 50,000 microsiemens per centimeter indicates aggressive saltwater that will accelerate zinc consumption and galvanic activity. High-conductivity readings mean anode replacement intervals should shift from 24 months to 12 months.
If you’ve isolated fasteners and replaced dissimilar metals, the maintenance workload drops significantly. You’re monitoring anode condition instead of managing active corrosion sites. Catch it now through quarterly inspection and structured replacement. Pay for it later with a $15,000-30,000 hull repair when structural aluminum fails.
The choice is straightforward. Quarterly haul-outs cost $400-600 each. Annual anode replacement costs $400-1,000. Comprehensive isolation retrofit costs $3,000-8,000 one time. Compare that to structural hull work at $10,000-40,000 when galvanic corrosion goes unmanaged. Prevention is not optional for aluminum hulls in saltwater. So, without further ado, get that boat hauled out.

Stay in the loop
Get the latest power and motor yacht central updates delivered to your inbox.